Welcome to an epic blog crossover event. Two authors collaborating to tell a single story over the course of several articles.
We’ve each mentioned the sketch2model project on our respective blogs, MyCarta and scibbatical, without giving much detail about it. Apologies if you’ve been waiting anxiously for more. Through the next while, you’ll get to know sketch2model as well as we do.
The sketch2model team came together at the 2015 Geoscience Hackathon (Calgary), hosted by Agile Geoscience. Elwyn and Evan Saltman (epsalt on twitter and GitHub) knew each other from a previous employer, but neither had met Matteo before. All were intrigued by the project idea, and the individual skill sets were diverse enough to combine into a well-rounded group. Ben Bougher, part of the Agile Geoscience team, assisted with the original web interface at the hackathon. Agile’s take on this hackathon can be found on their blog.
Conception
The idea behind sketch2model is that a user should be able to easily create forward seismic models. Modelling at the speed of imagination, allowing seamless transition from idea to synthetic seismic section. It should happen quickly enough to be incorporated into a conversation. It should happen where collaboration happens.
Geophysicists like to model wedges, and for good reasons. However, wedge logic can get lost on colleagues. It may not effectively demonstrate the capability of seismic data in a given situation. The idea is not to supplant that kind of modeling, but to enable a new, lighter kind of modeling. Modeling that can easily produce results for twelve different depositional scenarios as quickly as they can be sketched on a whiteboard.
The Hack
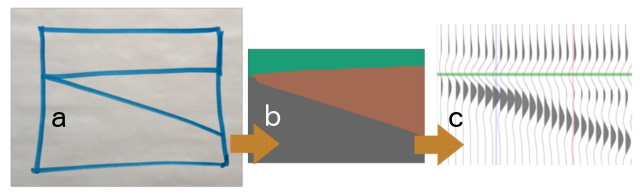
Building something mobile to turn a sketch into a synthetic seismic section is a pretty tall order for a weekend. We decided to take a shortcut by leveraging an existing project: Agile’s online seismic modelling package, modelr. The fact that modelr works through any web browser (including a smartphone) kept things mobile. In addition, modelr’s existing functionality allows a user to upload a png image and use it as a rock property model. We chose to use a web API to interface our code with the web application (as a bonus, our approach conveniently fit with the hackathon’s theme of Web). Using modelr’s capabilities, our hack was left with the task of turning a photo of a sketched geologic section into a png image where each geologic body is identified as a different color. An image processing project!
Agile is a strong proponent for Python in geophysics (for reasons nicely articulated in their blog post), and the team was familiar with the language to one extent or another. There was no question that it was the language of choice for this project. And no regrets!
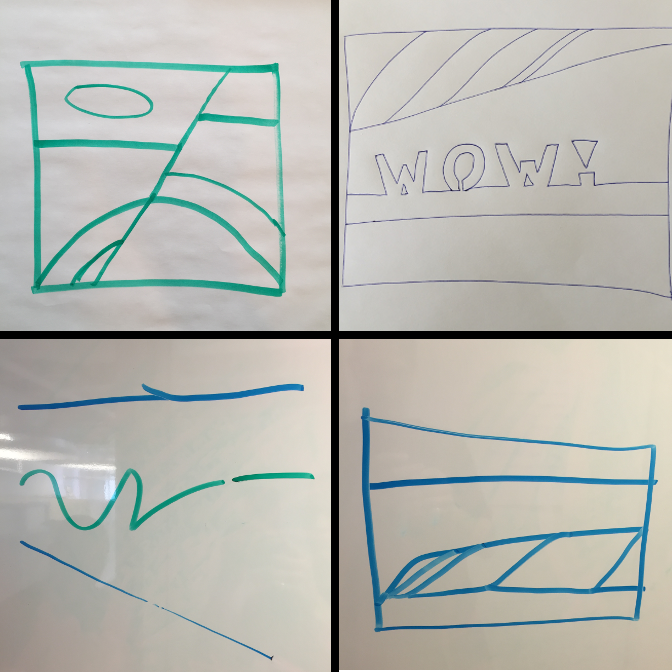
We aimed to create an algorithm robust enough to handle any image of anything a user might sketch while accurately reproducing their intent. Marker on whiteboard presents different challenges than pencil on paper. Light conditions can be highly variable. Sketches can be simple or complex, tidy or messy. When a user leaves a small gap between two lines of the sketch, should the algorithm take the sketch as-is and interpret a single body? Or fill the small gap and interpret two separate bodies?
Matteo has used image processing for geoscience before, so he landed on an approach for our hack almost instantly: binarize the image to distinguish sketch from background (turn color image into a binary image via thresholding); identify and segregate geobodies; create output image with each body colored uniquely.
Python has functions to binarize a color image, but for our applications, the results were very inconsistent. We needed a tool that would work for a variety of media in various lighting conditions. Fortunately, Matteo had some tricks up his sleeve to precondition the images before binarization. We landed on a robust flow that can binarize whatever we throw at it. Matteo will be crafting a blog post on this topic to explain what we’ve implemented.
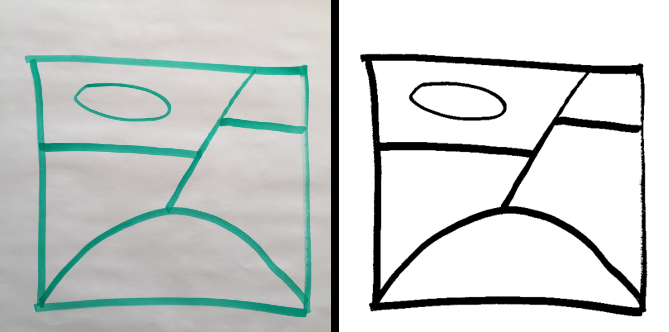
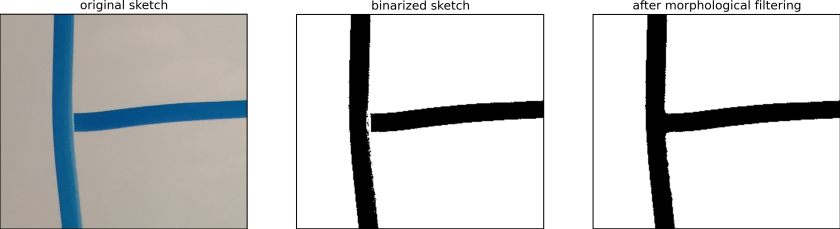
Once the image is binarized, each geological body must be automatically identified as a closed polygon. If the sketch were reproduced exactly as imagined, a segmentation function would do a good job. The trouble is that the sketch captured is rarely the same as the one intended — an artist may accidentally leave small gaps between sketch lines, or the sketch medium can cause unintentional effects (for example, whiteboard markers can erase a little when sketch lines cross, see example below). We applied some morphological filtering to compensate for the sketch imperfections. If applied too liberally, this type of filtering causes unwanted side effects. Elwyn will explore how we struck a balance between filling unintentional gaps and accurate sketch reproduction in an upcoming blog post.
Compared to the binarization and segmentation, generating the output is a snap. With this final step, we’ve transformed a sketch into a png image where each geologic body is a different color. It’s ready to become a synthetic seismic section in modelr.
Into the Wild
“This is so cool. Draw something on a whiteboard and have a synthetic seismogram right on your iPad five seconds later. I mean, that’s magical.”
Sketch2model was a working prototype by the end of the hackathon. It wasn’t the most robust algorithm, but it worked on a good proportion of our test images. The results were promising enough to continue development after the hackathon. Evidently, we weren’t the only ones interested in further development because sketch2model came up on the February 17th episode of Undersampled Radio. Host Matt Hall: “This is so cool. Draw something on a whiteboard and have a synthetic seismogram right on your iPad five seconds later. I mean, that’s magical.”
Since the hackathon, the algorithm and web interface have progressed to the point that you can use it on your own images at sketch2model.com. To integrate this functionality directly into the forward modelling process, sketch2model will become an option in modelr. The team has made this an open-source project, so you’ll also find it on GitHub. Check out the sketch2model repository if you’re interested in the nuts and bolts of the algorithm. Information posted on these sites is scant right now, but we are working to add more information and documentation.
Sketch2model is designed to enable a new kind of collaboration and creativity in subsurface modelling. By applying image processing techniques, our team built a path to an unconventional kind of forward seismic modelling. Development has progressed to the point that we’ve released it into the wild to see how you’ll use it.

Reblogged this on MyCarta.
LikeLike